
|
Adding Practice Locations |
|
Based on a review of the provider’s application the specialist will perform the following steps to ensure that all applicable practice locations required for the provider have been added or updated in the EPR Master Table Maintenance section.
From
the  main menu select “Master
Table Maintenance” from the drop-down menu.
main menu select “Master
Table Maintenance” from the drop-down menu.

Select “Practice" from the second drop-down menu.

The "Practice
Search" page is displayed.

Enter
the criteria and select the  button.
 DO
NOT use ‘&’ signs, make sure to type out the word ‘and’ instead. If
symbols are used this will create “XXX” to appear on applications when
printed from the FormBank Tab.
DO
NOT use ‘&’ signs, make sure to type out the word ‘and’ instead. If
symbols are used this will create “XXX” to appear on applications when
printed from the FormBank Tab.

If practice location
was not found based on the criteria either select the button
or the
button
or the  button to Add a New Practice.
If the practice location was found, then follow the steps below to review and update the existing practice location. If there is more than one location for a specific Practice then make sure to enter a "Friendly Name" in order to differentiate between the Practices.
From the “Practice Search Results” page select
the  link
next to the practice location to open the "Select
Location and Action” page.
link
next to the practice location to open the "Select
Location and Action” page.

Select the “SELECT ACTION” drop-down and chose the
appropriate action based on the following rules and the select.

“Edit” – select this option to change and update the existing practice location as shown.
If these changes are for
all providers at this practice, check the box "Check
here to update ALL providers who currently have this practice."
to avoid having to make the same changes for each provider.

A quick link to a context-based
report can be found at the top right of the Practice form. The
link shows
a count of the number of providers who are actively associated with that
particular practice location and the linked report lists the names of
the providers.

“Add New Practice” – select this option to return to the “Add New Practice” page and continue to step 9 below.

“New
Location” – select this option to add a new practice location (example:
satellite
office) Choose
the  icon to transfer ALL data from the existing practice
to the new location EXCEPT the Friendly Name, Physical Address, and Phone
and Fax fields. The
new location form may be edited to reflect other data changes. When
the form is saved, the system creates a Master Table entry with the same
Practice ID, but a unique Practice SubID.
icon to transfer ALL data from the existing practice
to the new location EXCEPT the Friendly Name, Physical Address, and Phone
and Fax fields. The
new location form may be edited to reflect other data changes. When
the form is saved, the system creates a Master Table entry with the same
Practice ID, but a unique Practice SubID.

If the action selected
above was to “Edit”, “Add
New Practice” or “New Location”
then once all information has been added or update select the  button
to save the practice location information.
button
to save the practice location information.
Continue the steps above for all practice locations listed by the provider on the application.
If “ADD NEW PRACTICE” is selected follow the steps below to add a new practice location for the provider:
In the “Location” section of the “Add Practice” page enter all applicable information based on the provider’s application.
Using the vertical scroll bar, scroll to the “Provider Relations” and “Credentialing” sections of the "Add Practice” page and enter all applicable information based on the provider’s application.

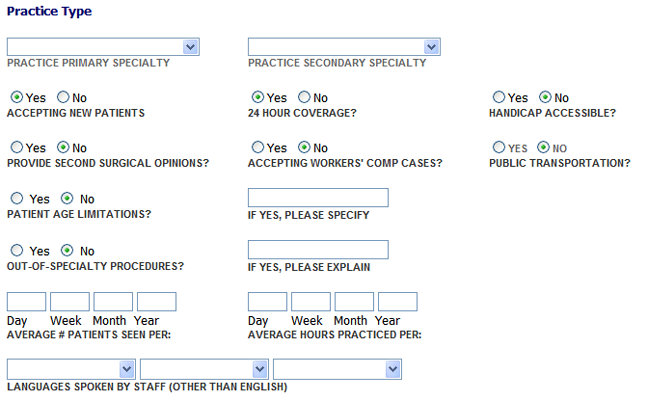
Using the vertical scroll bar, continue to scroll down the main “Add Practice” page to the "Practice Type” section and enter all applicable data based on the provider’s application.
Using the vertical scroll bar scroll down to the “Services” section of the “Add Practice” page and enter all applicable information.

Continue scrolling down with the vertical scroll bar to the “Office Hours” section of the “Add Practice” page and enter the applicable information. If planning on printing out applications within the system then make sure to enter office hours in both the 'Full Day' field and the 'Morning', 'Afternoon' and 'Evening' data fields. The applications vary; therefore, the data elements will requires different formats.

Continue to scroll down to the “Mailing Address” and “Billing Location” sections of the “Add Practice” page and enter all applicable information based on the provider’s application.

Continue to scroll to the “On Call Coverage – Primary” section of the “Add Practice” page. Based on the provider’s application enter all covering provider information using the “Primary”, “Secondary”, “Tertiary”, “Fourth” and “Fifth” coverage sections.


If these changes are for all providers at this practice, check the box "Check here to update ALL providers who currently have this practice." to avoid having to make changes for each provider.
After all practice
information has been entered select the button to save the
information.
button to save the
information.
Continue the steps above to enter all applicable practice locations for the provider based on the provider’s application.