

|
Committees |
The "Committee Manager" administrative option allows an administrative user to view, edit or delete committee information that is used in the Verification Process (See the Pre-Committee Review and Committee Review for details).
The Committees need to be setup prior to completing the Verification Process. This is a web based system therefore it was intended for voting members on the Committee to be able to review the Primary Source Verifications items for a Provider and then Vote whether on accepting this provider on staff.
From the  main menu section, select "Committee
Manager" from the drop-down menu.

Select "Committees" from the second drop-down menu.

When no Committees exist, an empty list will display.

To add a new committee, click on the New Committee button.

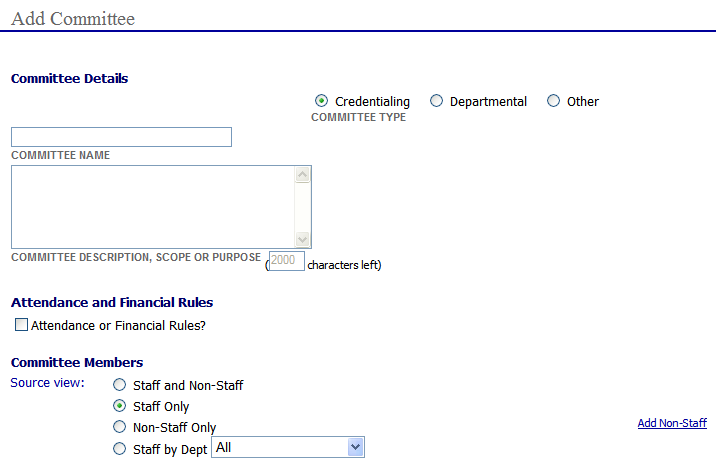
The "Add Committee" page is displayed. There are three main parts to the Add Committee page: Committee Details, Attendance and Financial Rules and Committee Members.
Committee Details
The first part of the "Add Committee" page is dedicated to the Committee Details.

In the new Committee Manager section, select whether
the Committee being added will be a Credentialing Committee, a
Departmental Committee or Other by
selecting the appropriate radio button.
Enter a name in the 'Committee Name' section.
Enter a description in the text box provided.

Adding Attendance and Financial Rules
The second section of the "Add Committee" page is dedicated to any Attendance and Financial Rules that should be applied to the Committee.

Select the checkbox if Attendance and Financial rules apply.

If the Attendance and Financial Rules checkbox has been marked upon creating a new Committee, the user will be redirected to the "Attendance and Financial Rules" page.

Attendance Rules
Choose whether the Committee should be Mandatory or not by selecting the appropriate radio button.

If ‘Yes’ is selected, continue selecting the options on the right.

For the ‘Count of % of Meetings’ drop-down, select between counting the exact number of meetings or a percentage of the meetings.

After selecting how the attendance will be tracked, select the amount or percentage with the ‘Amount’ drop-down, which spans from 1 to 100.

Select whether the Attended Meetings or the
Missed Meetings will be tracked, with the ‘Attended or Missed’ drop-down.
Select the 'Per Period' from the drop-down menu.

For example:
A user can select to make a Committee’s attendance mandatory for all members, 75% of the time per year. In other words, for this Committee, members are required to attend 75% of the meetings, failing to do so, may result in a financial penalty.

Financial Rules
After selecting whether the Committee is mandatory, users have the option of setting up Financial Rules for the committee. There are four financial rules to choose from: Check any or all that apply to the Committee that is being set up.

After selecting the Financial Rules for the Committee, three more options must be fulfilled; Basis, Amount, and Per options.
Basis
The Basis drop-down has two options: Attendance Rule and Standard.
Select Attendance Rule, if the Committee’s Attendance Rule has been set to Mandatory.
If there is no Attendance Rule, set the Basis to Standard.

Amount
The Amount text box refers to the Monetary amount for the Financial Rule.

Per
The Per drop down has nine standard options to select from depending on which Rule has been selected.

For example:
Based on the Mandatory Attendance Rule that was previously selected, this Committee will have one Financial Rule, based on the Attendance Rule, for the amount of $50.00 and will be applied per Missed Meeting.


After choosing the appropriate options for the
Committee, select the to save the Attendance and Financial
Rules.
Editing Attendance and Financial Rules
(Adding Rules after a Committee has been created)
If a Committee is created and Attendance and Financial Rules need to
be added after the fact, click on the pencil icon  to
edit the Committee. Once the application refreshes to the "Edit Committee
Details" page, there will be a link to Edit
Rules towards the middle of the page.

Select the Edit Rules link. The "Attendance and Financial Rules" window will open.

The Change or Delete Rules window is an exact replica of the Attendance and Financial Rules page that opens when a user is initially adding a Committee with Attendance and Financial Rules. Please refer to the ‘Adding Attendance and Financial Rules’ in the sections above for more information on the options for Committee Rules.
 The link for editing the Attendance and Financial Rules for
a committee will not appear until AFTER the committee has been created.
The user must click on the pencil icon that appears next to the committee
on the Committee List page in order to further edit the attendance and
financial rules information. Please refer to the ‘Editing Attendance and
Financial Rules’ for further information on this subject.
Deleting Attendance and Financial Rules
If a Committee has been created or edited with incorrect Attendance
or Financial Rules, and the selected options need to be removed, click
on the pencil icon  to edit the Committee. Once the
‘Edit Committee Details’ page opens, click on the Edit
Rules link (please see the ‘Editing Attendance and Financial Rules’
section for a detailed description of where the ‘Edit Rules’ link can
be found). After the ‘Change or Delete Rules’ window has opened,
select which Rule needs to be removed.
Deleting an Attendance Rule
To remove a mandatory rule, open the "Attendance and Financial Rules" window.

Change the radio button from Y for Yes to N for No.
 to
to

Select
the  button to save the change.
Deleting a Financial Rule
To remove a Financial Rule, open the "Attendance and Financial Rules" window. Below displays the Financial Rules section of the page.

Uncheck
the checkbox that was originally checked when applying the Financial Rule.

Select the  button to save the
changes. The selected Financial
Rule will be removed.

Committee Members
The last section of the "Add Committee" page pertains to adding members to the Committee.

This section is further broken into five "Source View" filters for easier navigation through potential committee members.
The five source view filters are designed to facilitate the source list of committee members:

All: A combined list of Medkinetics users, current active providers on staff, and all non-staff members that have been added to your facility.
Staff Only: All Medkinetics users (that are not healthcare providers).
Providers Only: All active healthcare providers at the facility.
Non-Staff Only: Non-Staff Members that have been manually entered using the Add Non-Staff link.
Providers by Dept: Filters providers by the Hospital Department that has been set for him or her on their Personal Data page (the Hospital Department is listed under the Facility Data section on the Personal Data page).
Select the appropriate 'Source View' by selecting the appropriate radio button.
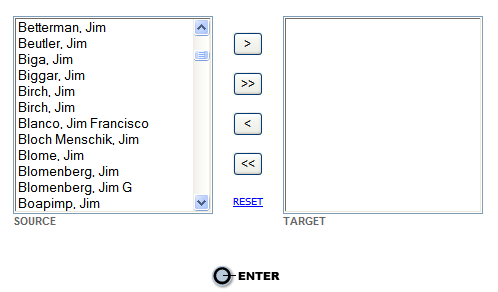
Using the Move-A-Matic, highlight the staff member or members from the source window (on the left) to the target window (on the right).
Click on the  button to move the
member(s) over.

The  button
should only be used if all members from the source window need to be moved
to the target window.
Select
the  button to save the Committee.
Committee List
Once the Committee has been saved, it will appear on the "Committee List" page. Depending on which type of Committee that was created (Credentialing, Department, or Other), the committee will appear under the appropriate section.

Selecting the  icon, users can expand committees listed under the main section.

Selecting the  will collapse the section.
Edit Member Details
After a Committee has been created, users have the option of editing member details. This functionality is beneficial for two reasons. The first reason is for Committees that where Attendance or Financial Rules have been applied. The second reason is for Credentialing Committees where members must vote on potential healthcare providers. To edit member details for a committee, the committee must have already been created for the link to appear.
On
the ‘Committee List’ page, click on the ![]() pencil icon to
edit the selected Committee. The page refreshes to the
"Edit Committee Details" page. Towards the center of
the page, on the right hand side, is a link that says: Edit
Member Details.
pencil icon to
edit the selected Committee. The page refreshes to the
"Edit Committee Details" page. Towards the center of
the page, on the right hand side, is a link that says: Edit
Member Details.
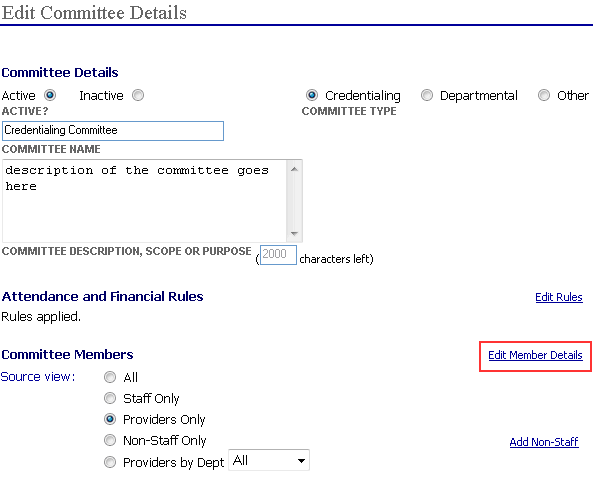
Select the "Edit Member Details" link. The "Member Details" page opens.
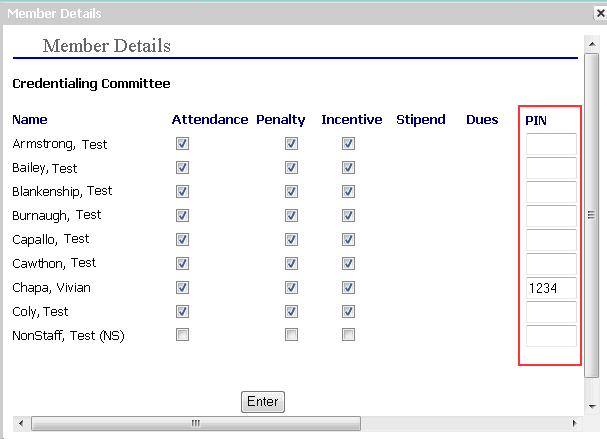
On the Committee level, if a user decides to uncheck any of the checkboxes, then that particular rule(s) will not be enforced for that particular committee member. This is used mostly for reporting and will not affect any part of the application. For instance, the screenshot above states that none of the three rules that were set up for this committee will be applied to the Non Staff (NS) member.
PIN
The last column to the right, which is enclosed in red, is the PIN column. Users can create a Personal Identification Number for any or all Committee Members. If a user decides to set up PIN numbers for the members, those members must also be given their login for the EPR system so that they can log into the application and vote on their own behalf. For most Medkinetics users, only the Medical Staff person will have a PIN number where he or she can vote and Grant Credentials for the healthcare providers that are being reviewed. For instance, Vivian Chapa is the only voting member for this committee.
Adding Non-Staff
The CME Manager gives users the option to add non-staff members to their courses.
To add a non-staff member click on the Add Non-Staff link that is located on the right hand side of the page.

The "Non-Staff Personnel" window opens.
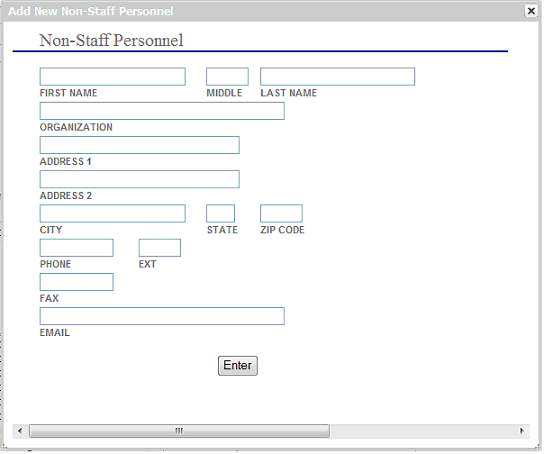
Select the Enter button to save the new non-staff personnel to your facility’s list of Non-Staff Members. Users can view who has been added to the Non-Staff Members by clicking on the ‘Non-Staff Only’ radio button.