|
Attaching Documents to a Provider (including Direct Scan) |
|
The "Attachments" section allows you to attach notes and documents to a provider's record. Once personal data for the provider has been created, items (such as a diploma) it can be attached to the provider's data record.
With a provider attached
to the application through the Pick Provider or Provider Quickpick function,
the  drop-down menu adds 3 new options; Provider
Data, Facility
Date, Form Bank and Attachments.
drop-down menu adds 3 new options; Provider
Data, Facility
Date, Form Bank and Attachments.
Select "Documents"
from the "Attachments"
drop-down menu.
The "Attach Documents" window is displayed.
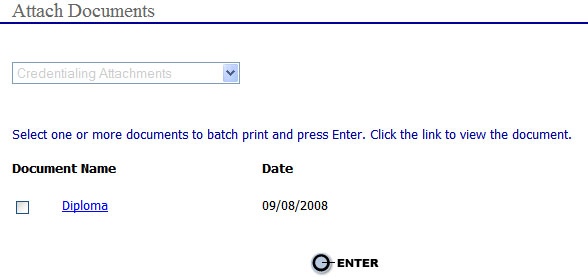
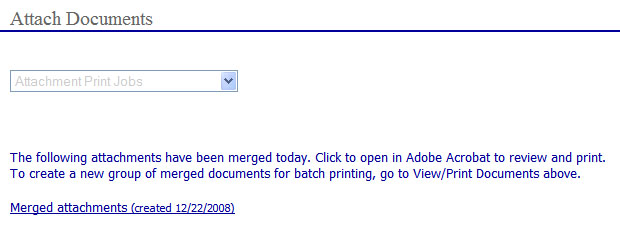
Select the type of attachment or "New Attachment" from the following drop-down menu.
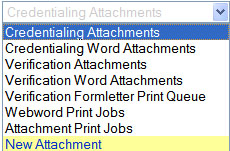
Once the selection from the drop-down is made, the appropriate documents for attachment are displayed.

Select the checkbox(s) and press the Enter button. This will merge the documents into one attachment to be printed if necessary.
Using the Attachment Tool On The Toolbar
Attachments can also be categorized by type (License, DEA, Medical Training, etc.) and linked directly to a particular data item. Attachments may also remain uncategorized and unlinked. All attachments, whether linked to a data item or not, are still found in a list in the Provider Data > Attachments area.
The Attachment icon![]() (page
with paperclip), is located on the toolbar of the detail page in 9 provider
data areas. The
nine areas include Boards,
DEA/CDS, Hospitals,
Insurance, Licenses,
Med Training,
References, Practices
and Work History.
(page
with paperclip), is located on the toolbar of the detail page in 9 provider
data areas. The
nine areas include Boards,
DEA/CDS, Hospitals,
Insurance, Licenses,
Med Training,
References, Practices
and Work History.
From one of these areas, choose a single
data item and from the form page, open the Attachment icon ![]() . From
here, documents may be linked to the selected data entry in three ways.
. From
here, documents may be linked to the selected data entry in three ways.
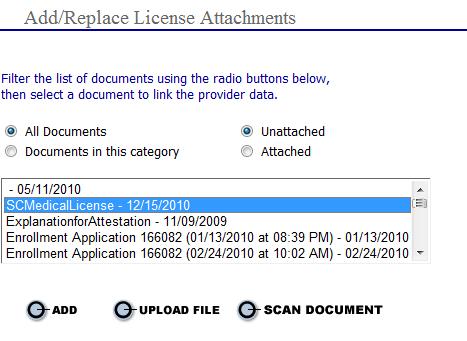
Link a document that
is already uploaded into the EPR. Use
the radio button filters to show lists of All
Documents or Documents in this
category and Attached or
Unattached documents. Select
the document and click  to link to the data item.
Browse for a new document
on your hard drive or network drive with the  button to
link the document to the selected data item.
button to
link the document to the selected data item.
Click the  to use the Basic Scan Tool interface. This
tool may be used if you have a scanner connected to your PC or if you
have scanning software installed on your network scanner. Place
the document on the scanner. Click
Scan in the scan interface window. Select
the scanner's TWAIN driver when prompted. The
driver selection will invoke the scanner software. Not
all scanner interfaces operate the same way. Use
the usual procedure to preview, select the image, set the resolution and
scan the document. When
the scan is complete, close the scanner interface. A
thumbnail of the document will be seen in the Basic Scan Tool window.
Click Upload to simultaneously upload the
document and link it to the selected data item.
to use the Basic Scan Tool interface. This
tool may be used if you have a scanner connected to your PC or if you
have scanning software installed on your network scanner. Place
the document on the scanner. Click
Scan in the scan interface window. Select
the scanner's TWAIN driver when prompted. The
driver selection will invoke the scanner software. Not
all scanner interfaces operate the same way. Use
the usual procedure to preview, select the image, set the resolution and
scan the document. When
the scan is complete, close the scanner interface. A
thumbnail of the document will be seen in the Basic Scan Tool window.
Click Upload to simultaneously upload the
document and link it to the selected data item.
Linking Attachments To Specific Data Items
In many provider data areas there is a paperclip icon on the toolbar where existing attachments can be viewed or new attachments may be uploaded and "linked" to a specific piece of data. The linked attachment concept has been expanded to include the main Credentialing Attachment area and the Verification area.
Credentialing Attachments
Choose
the menu option and click "Attachments".
Select "Documents"
from the "Attachments"
drop-down menu.
The "Attach Documents" window is displayed.
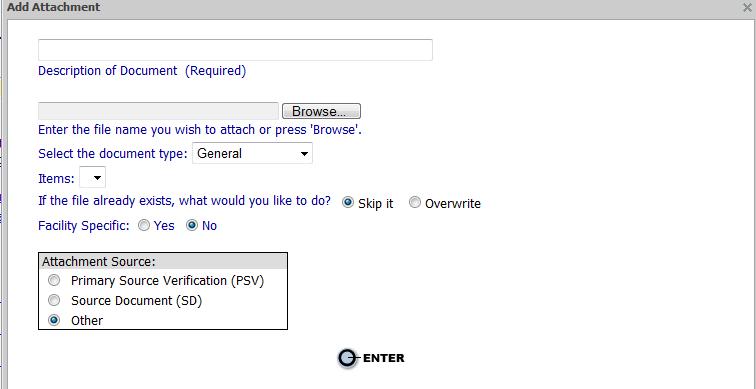
Select "New Attachment" from the following drop-down menu.
Enter a Description of Document (required) and browse for the file on your computer or shared drive. Next pick the Document Type from the select box and choose the data item itself from the next select box. Finally, tag the attachment as Source, PSV or Other to further classify it.
_0911.jpg)
 Linking the attached document to piece of provider
data and tagging as Source or PSV are optional features. Documents that
are not linked to data remain in the Credentialing Attachment list and
are viewed from the paperclip icon in the All Documents / Unlinked list.
Meta data
for attachments, further classifying them as Source
Document, Primary Source Verification
(PSV) Document or Other,
may be entered when an attachment is uploaded. This data will help distinguish
source files from the many attachments that may be produced during the
verification process. The Document Source radio buttons are set to Other
by default. The document Source meta data may be entered in Credentialing
> Attachments > Documents as well as Verification.
Linking the attached document to piece of provider
data and tagging as Source or PSV are optional features. Documents that
are not linked to data remain in the Credentialing Attachment list and
are viewed from the paperclip icon in the All Documents / Unlinked list.
Meta data
for attachments, further classifying them as Source
Document, Primary Source Verification
(PSV) Document or Other,
may be entered when an attachment is uploaded. This data will help distinguish
source files from the many attachments that may be produced during the
verification process. The Document Source radio buttons are set to Other
by default. The document Source meta data may be entered in Credentialing
> Attachments > Documents as well as Verification.
Verification Attachments
In verification, the Attachment action (button) pops up a new window with tabbed views that similarly shows documents already linked to the data item on the Linked Attachments tab.
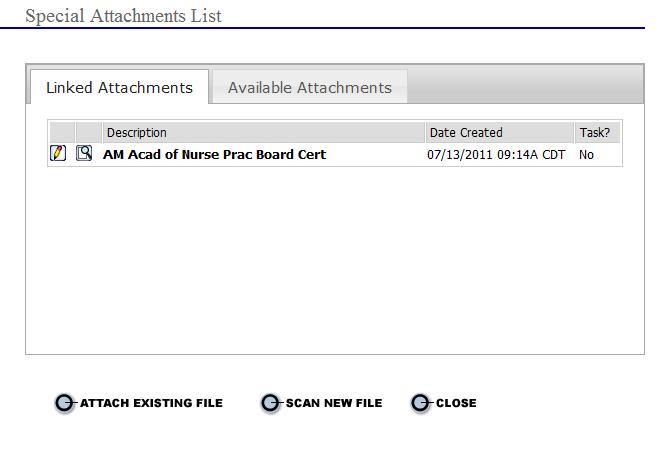
On the second tab all Available Attachments are listed. Users may choose an existing document from the list or upload a new file. The new file is found in the Available Documents list after upload.
_0911.jpg)
Check the box next to the document name and press the "Link Files" button to link to the data item.
Replacing a linked attachment with a more current document
When
a data item has a linked attachment and the time comes to replace the
attachment with a newer document, simply go to the detail page for that
data entry and use the Attachment icon ![]() on the toolbar to
link the new document using one of the methods above. The
new document will automatically replace the previous one. The
older document can still be found in the provider's attachments (Provider
Data / Attachments) and may still be accessed via reports. The
old document is also listed under the Attachment icon with the filters
set to Documents in this category AND
Attached.
on the toolbar to
link the new document using one of the methods above. The
new document will automatically replace the previous one. The
older document can still be found in the provider's attachments (Provider
Data / Attachments) and may still be accessed via reports. The
old document is also listed under the Attachment icon with the filters
set to Documents in this category AND
Attached.
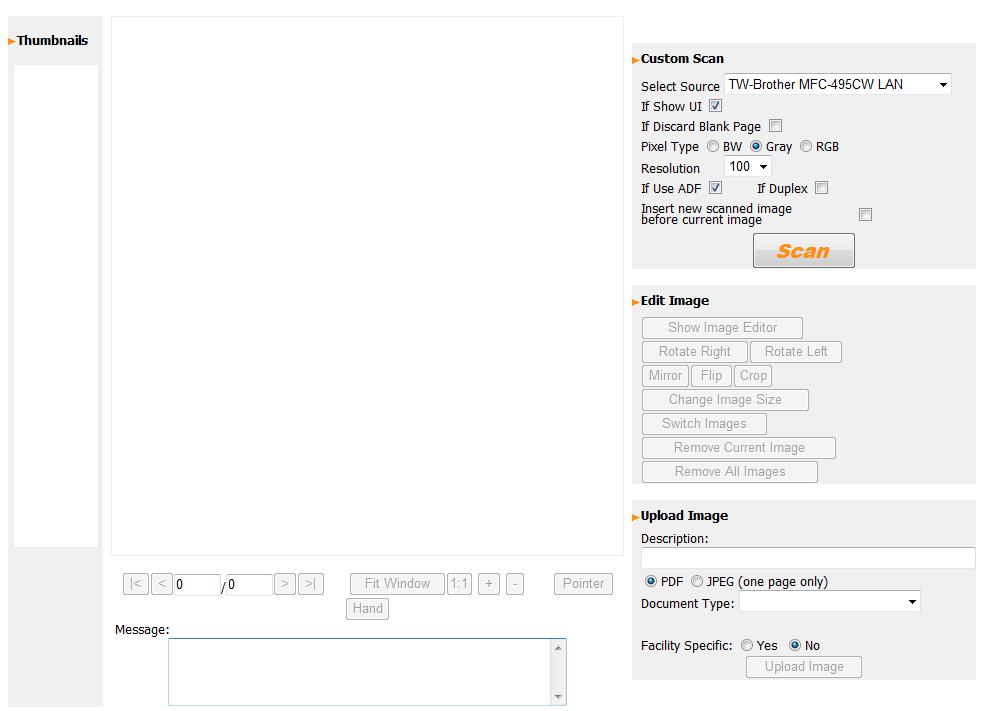
Direct Scan Tool
A Direct Scan Tool with Basic and Advanced web interfaces can be found on the menu under Credentialing > Provider Data > Attachments. The tools detect the TWAIN driver on the user's computer and invoke the scanning software that the user has installed. The direct scan tools may be used with personal scanners (plugged directly into the user's PC) and network scanners when the scanning software is installed on the user's computer.
Basic Scan Tool
The Basic Scan Tool has two buttons - Scan and Upload. When Scan is pressed, the local scanner software opens and users may operate the scanner just as they usually do outside of the EPR. When the scan is complete, close or minimize the scanner software and press Upload to attach the document to the provider record in the EPR. Default settings like resolution and file type are controlled in the user's scanning software, not the Basic Scan Tool.
Advanced Scan Tool
The Advanced Scan Tool offers more comprehensive image manipulation like B&W/Grayscale/RGB (color) settings, Flip Horizontal or Vertical, Mirror Image, Resolution and Resizing. The Advanced Scan Tool also handles multiple page documents for those with automatic document feeders (ADF).
At the bottom of the Advanced Scan Tool window, users may set the file type, name the document and choose an EPR attachment type (License, DEA, etc.). After choosing the Type, another picklist appears and where the specific data entry can be selected and linked to, if desired.