
|
Performing Primary Source Verification Tasks |
The next step in the primary source verification process is to begin generating and distributing primary source verification correspondence and/or performing on-line primary source verifications. The specialist will perform the following steps to generate the required correspondence for each primary source verification item listed in the Adding a Provider to the Verification Log section.
Selecting a Verification Task for a Provider
Select
 on the EPR system main menu bar and choose "Verification"
from the drop-down menu.

Select "Verification Log " from the second drop-down menu.

The main “Verification Log” page is displayed.

Select the  icon
next to the description for the provider requiring primary source verification
and to open the “Perform Verification
Task” page.

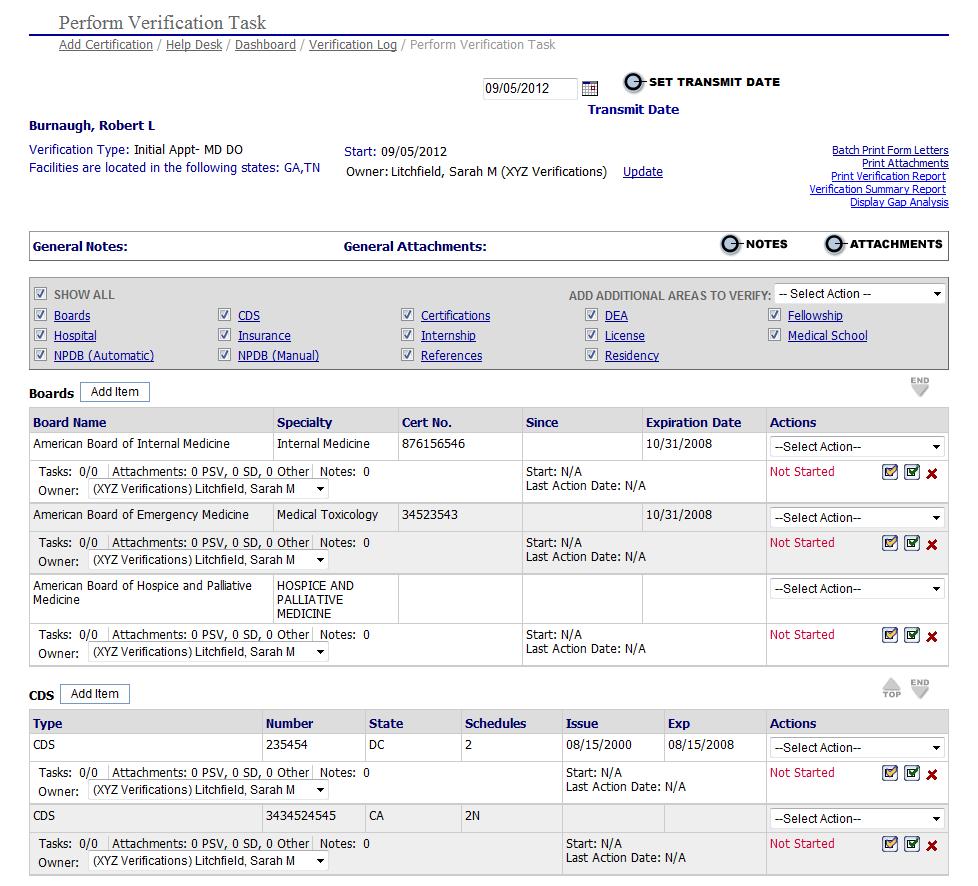
Top of Perform Verification Task Page Elements
Provider Name
The states where the provider’s practices are located. A red alert message will appear here if the provider has no license data in the state where his practice(s) is/are located.
The start date for the verification
Four links to reports and batch printing for attachments and form letters are available in the top right corner.
General Notes and Attachments that pertain to the provider’s overall verification are shown at the top of the page. The count is shown when notes or attachments are present. To view or add new notes or documents, click the Notes or Attachments button.
Set Transmit Date. This is an optional field that may be used if an outside organization is used to process verifications.
Page View, Quick Links and “Add Additional Areas To Verify”
A gray box shows each area that is listed below. Click the name of the area to jump down the page to see the details. Checkboxes provide a way to show or hide areas, shorten the page view and eliminate scrolling.

There are also Top and End arrow icons at the top right of each area header to provide a quick way to jump to the top or bottom of the screen.

A drop-down box lists the additional areas that may be verified. Select an area to find data that may have been entered after the verification start date. A pop-up window displays any data not already part of the verification. Check the box next to the new item and click Add to make the item part of the verification task list.

Choose the additional area and item to verify
and click the  button. Choose
an Owner if necessary.

Verification Areas
In the main part of the Perform Verification Task page, the name of each area is listed, followed by a grid that contains the data items of that type and some details pertaining to the item in the first row.
The second row shows:
1. Count of tasks/completed tasks
2. Counts of Notes and Attachments that pertain to the specific item
3. The start date and last action date for tasks pertaining to the specific item

Items are listed in alternating shaded rows for easy reading. Inactive data items are shown in italicized type.
New Actions Selector and Tool Icons
Actions
On the right side of grid, the first row holds the Actions drop-down box. The select box provides a very compact method for choosing the method of verification.
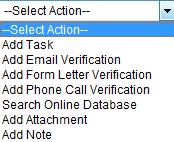
All areas contain a set of common task types in the Actions drop-down.
• Add Task Adds a task/note. Mark complete with the green check mark.
• Add Email Verification Send an email directly from the form. Mark complete with the green check mark.
• Add Form Letter Verification Mark form letters complete with the green check mark or leave open to record the response at a later date.
• Add Phone Call Verification Mark the phone call complete with the green check mark, if follow up is not needed.
• Search Online Database Attach a screen capture from one of the websites on the list or one of your own choosing.
• Add Note
 Both the Note and Attachment actions have time-saving options
to count the note/attachment as a task and/or automatically close or
complete the task, once it is entered.

Additional Special Actions are available for the following areas:
NPDB (Automatic): For those who have designated Medkinetics as the agent for your NPDB account, a single action, Initiate NPDB Query, is available along with Attachments and Notes.
Criminal Background Check: The Background Check action triggers the PreCheck query for facilities which have set the account up in advance through Medkinetics.
OIG: OIG DB Search performs an instant OIG query and documents the result as a note/task.
GSA (EPLS): The EPLS action initiates an instant EPLS query and documents the result as a note/task.
Licenses: Online Lookup pops up a small info window and a new browser window or tab that goes to the state licensure URL.
Hospitals: If a URL is entered on the hospital affiliation page, the Online Lookup action will appear in the list. It pops up a small info window and a new browser window or tab that goes to the hospital’s online verification letter website.
When tasks have been entered, the task count becomes a hyperlink that opens the task list. Click on individual task descriptions to view the specific document. Likewise, the Attachment and Note counts become hyperlinks when there are documents to view.

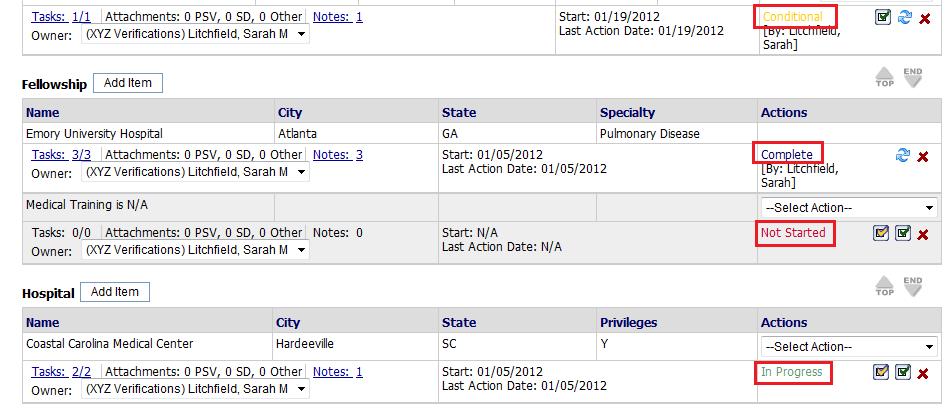
Status
The status of the item is shown in the familiar color scheme.
• Not Started
• In Progress
• Complete
• Conditional (verification/completion)

Tool Icons
 The red X icon deletes the
item from the verification list.
 The double arrow icon re-opens
a Complete or Conditional item so additional documentation can be entered.
 The green check mark icon
marks the item complete. When an item
is Not Started (no tasks have yet been created), the green check mark
creates a single task that denotes “Verified By External Method” and closes
the item. The subject and/or body of this note may be modified by opening
the notes for the item. Use the pencil icon to make changes. When
tasks have already been documented, the green check mark icon simply marks
the tasks and the item complete.
 The yellow check mark icon
marks an item Conditionally Verified. A conditional verification triggers
a note pop up so the conditional status may be explained.
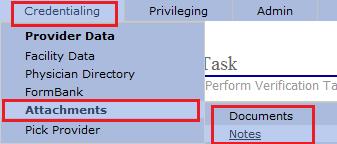
All verification notes and attachments are available in Provider Data > Attachments > Documents.

On a provider’s data list pages (for example, the License List page, Insurance List page or Expirables-At-A-Glance page) the small paper clip opens the most recent attachment associated with the data item. This includes attachments made during a verification.
